Storage Device Configuration and Management
Swift Drives
For more information on how to manage capacity, see: Planning and Managing Capacity
Note
Changes to the drives take place immediately and further changes will not be possible until the current change finishes.
Add a Drive
Example Cases:
- Adding capacity to a cluster
- Replacing a previously removed drives
Unmanaged Drives
On the Swift Drives page, drives that are not yet being used for Swift appear in the Unmanaged Drives list. Each drive's status will be either Ignored or Available. Drives are Ignored automatically when they are already mounted (like the drive the OS is installed on). If you are sure you want to use the drive for Swift anyway, then select the drive and click Unignore. Likewise, drives you do not want to be used may be selected and the Ignore button clicked.
Format the drive(s)
Select one or more drives from the Unamaged Drives list using their checkboxes or the all/none control. Click Format.
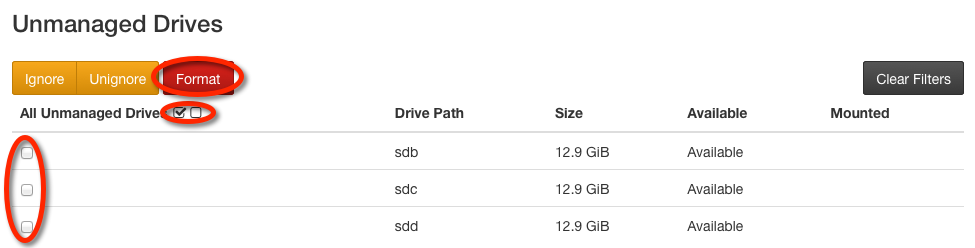
When the operation has finished, the drive(s) will appear in the Manage Swift Drives list.
If the format operation fails, a Format Devices Failed alert will appear on the Alerts page.
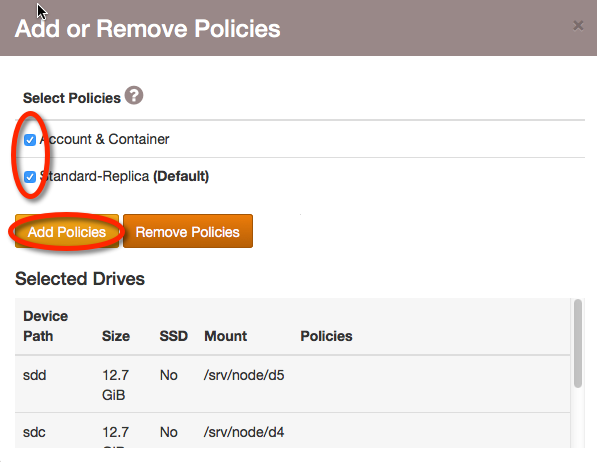
Add Policies to the drive(s)
Select the drive(s) to which you wish to add policies. You may select individual drives using their checkbox or a category of drives grouped by status or policy participation.
Click the Add or Remove Policies button to open the policy selection modal.

Select the policies which you would like the previously-selected drives to participate in. Click the Add Policies button.
Node Drive Management
Remove a Drive
Example Cases:
- A drive has failed and need to be replaced
- A drive is causing issues and needs to be replaced
- A drive is replaced by a larger drive to increase cluster capacity
Remove the drive from the policies
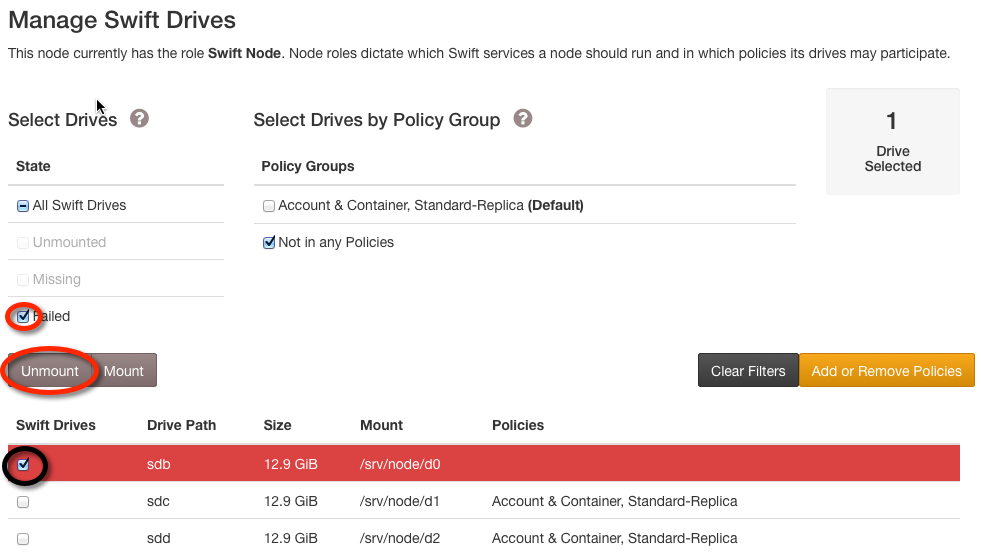
On the Swift Drives page, locate the drive in the Manage Drives list. Selecting multiple drives by state Missing or Failed may be appropriate depending on your circumstance.
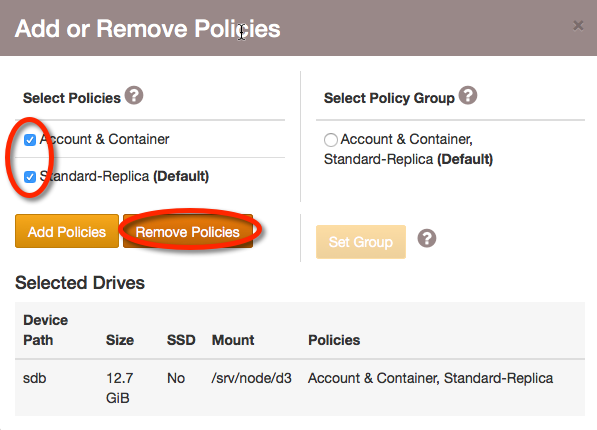
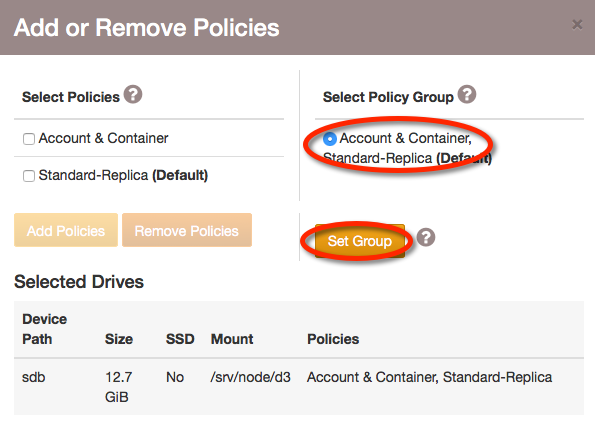
Click the Add or Remove Policies button to open the policy selection modal.
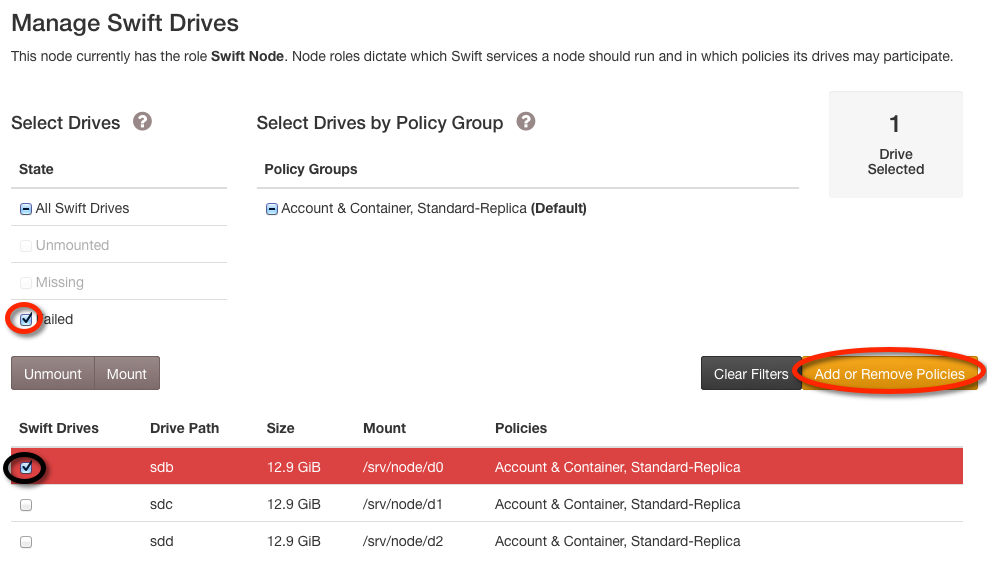
If the drive is being decommissioned, ensure that all of the policies are selected. Click the Remove Policies button.
Unmount the drive
Once the modal has closed, select the drive(s) again and click Unmount.
Note
Once the drive has been physically removed from the node, there will be an option to Delete a Missing Drive.
Identifying device in the data center
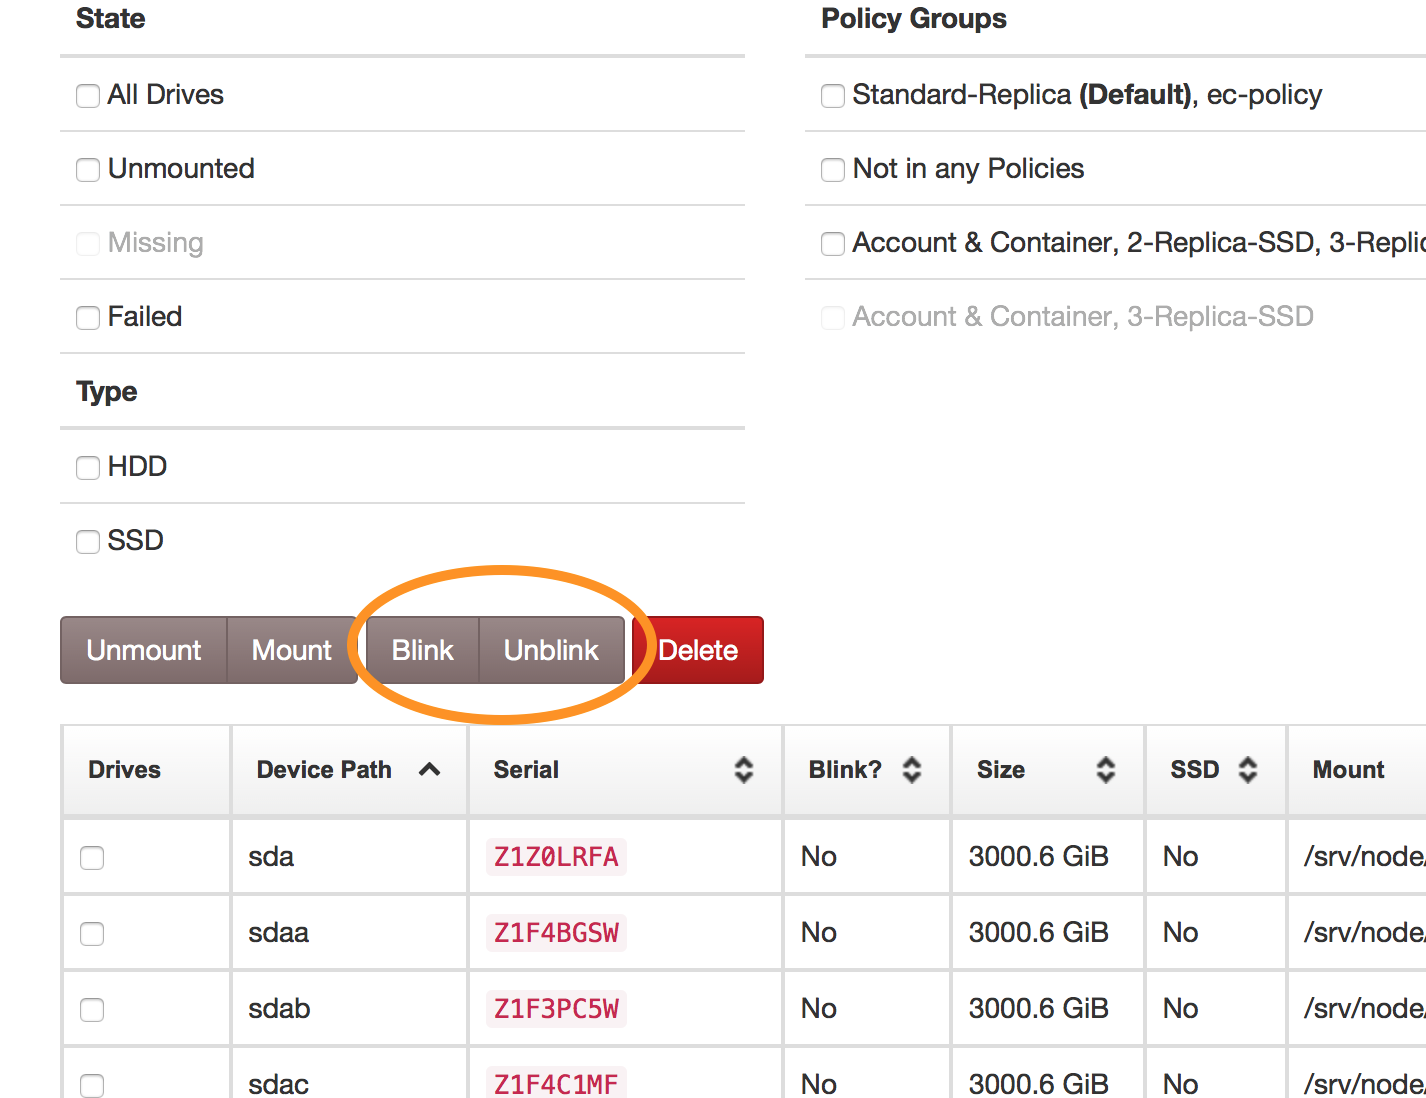
Making a drive tray blink via the SwiftStack Controller
For device identification select the Blink or Un-Blink for drive chassis identification.
Unmount and blink drive tray automatically when device fails
A SwiftStack Node can be configured to automatically unmount and blink the drive chassis when the device fails. This is configured from the Cluster Configuration page. See: Unmount and blink failed devices
Making a drive tray blink via command-line on SwiftStack Node
This utility is also available via the sdt CLI utility on the
SwiftStack storage node. The sdt command can make the drive tray
for one or more devices blink. For example, to make the drive trays
associated with /dev/sdj and /dev/sdk blink:
$ sudo sdt blink sdj sdk
This can help you locate the correct drives in the chassis in order to replace them.
Blinking drives show up in the sdt probe CLI output under the "BLINK"
column. A ? means the script could not determine if the drive tray is
blinking or not (the chassis may not be supported, the device could be
"virtual", or the device may not be in a drive tray that has an LED). A
X indicates that the drive tray is currently blinking. No output in the
"BLINK" column indicates that the drive tray is not currently blinking.
You can make one or more drive trays stop blinking:
$ sudo sdt unblink sdj sdk
Clean Up a Drive
After removing a drive from a node, if you later want to re-use the drive in the cluster, you should ensure that the data on the drive is removed so that it looks like a new drive to Swift.
Log in to Node.
Perform these commands on the node containing the drive to be cleaned up.
Unmount the drive.
$ sudo umount /srv/node/d3Format the drive.
$ sudo mkfs.xfs –f –i size=256 /dev/sde
The drive should now be ready to take into use again, as if it was a brand new drive.
Change Policies on a Drive
Example Cases:
- Needs have changed and drives must be moved from one SwiftStack Storage Policies to another.
See Removing Capacity for more information.
In this use case, drives are assumed to already be formatted and mounted. If they are not, use the procedure for Add a Drive.
Select the drive(s) for which you wish to modify the policies. You may select individual drives using their checkbox or a category of drives grouped by status or policy participation.
Click the Add or Remove Policies button to open the policy selection modal.
Select a Policy Group, click Set Policies. Whatever policies need to be removed will be removed, and whatever policies need to be added will be added to bring these drives in-line with the other drives using this group of policies.
Remount an Unmounted Drive
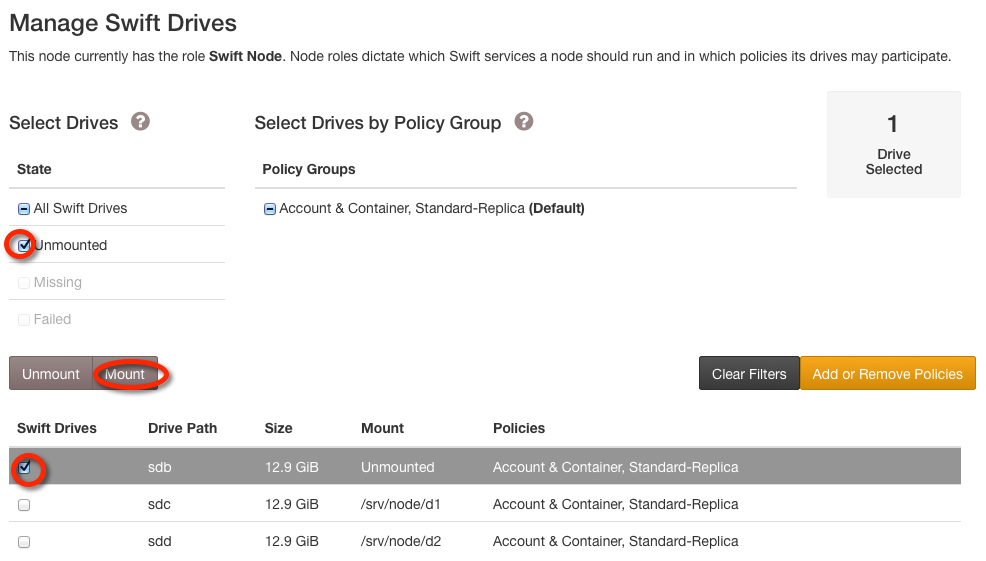
Unmounted drives will show up with an grey background in the Manage Swift Drives list, and an Missing device alert will be raised.
Select the unmounted drive(s) by checking Unmounted in the Select Devices by State list. Click the Mount button.
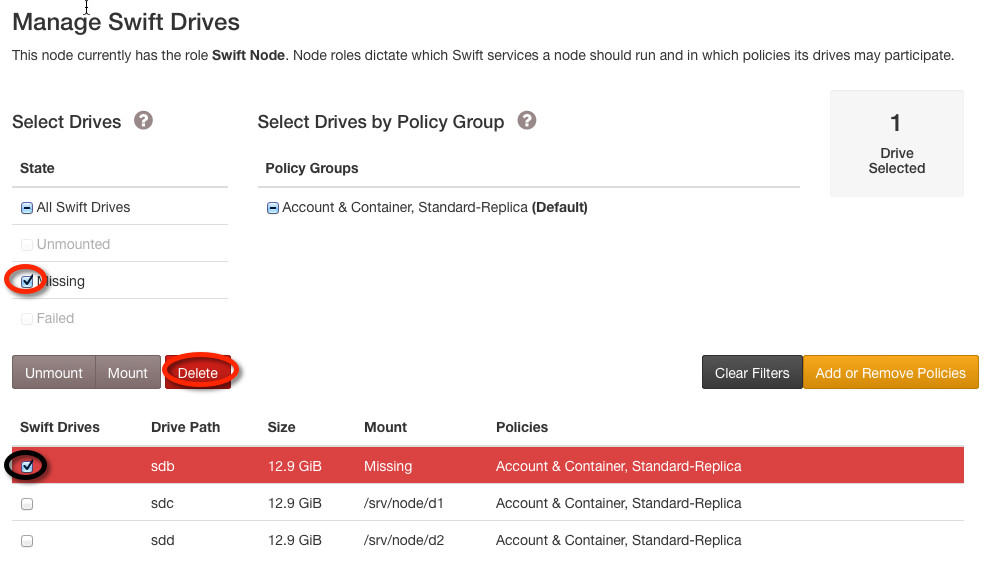
Delete a Missing Drive
Example Cases:
- Drive has been physically removed from the server.
Missing drives will show up with a red background in the Manage Swift Drives list, and an Missing device alert will be raised.
Select the failed drive(s) by checking Failed in the Select Devices by State list. Click the Delete button.
Note
The Delete button will only appear when there are missing drives. Only missing drives may be deleted.